Growing Great Okra

This post is about growing great okra. But before we start, you should know something important. There are two types of people in the world (or three if you count those that refuse to be put in a category.)  The two types of people are those who love, love, love okra and those who hate okra with a passion bordering on frothing at the mouth. 

If you are in the first category, read on.  You can probably guess which category I am in.  If you’re in the hate okra category, you probably already quit reading at the word okra.  If you’re a glutton for punishment but very brave and are still here even though you hate okra, go put a cold compress on your forehead and I’ll try to make this painless for you.

About Great Okra’s Lineage

Researchers believe that okra came from near Ethiopia.  It has an old and glorious history (like us Grammys).  The ancient Egyptians were growing okra as early as the 12th century BC. Drawn by its delicious and nutritious taste, folks started growing it all around North Africa and the Middle East. Back then, they cooked the seedpods, or toasted and ground the seeds to make a coffee substitute, a custom that continues today.

Enslaved people probably brought okra to the New World in the 1700s from West Africa. Western Europe learned the joy of okra, too. Enslaved people, whose word for okra was gumbo, taught Louisiana Creoles how to use okra to thicken soups and voilà, cher, creole gumbo was born. Another fun fact about okra is that it has been used to create paper and ropes!

You can really tell okra is in the same family as hibiscus.  The blooms look so much like each other!  This photo is of a small okra pod and an okra bloom.
You can really tell okra is in the same family as hibiscus. The blooms look so much like each other!

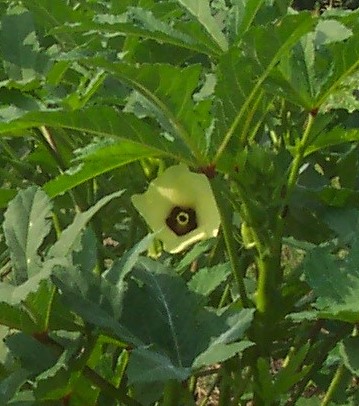
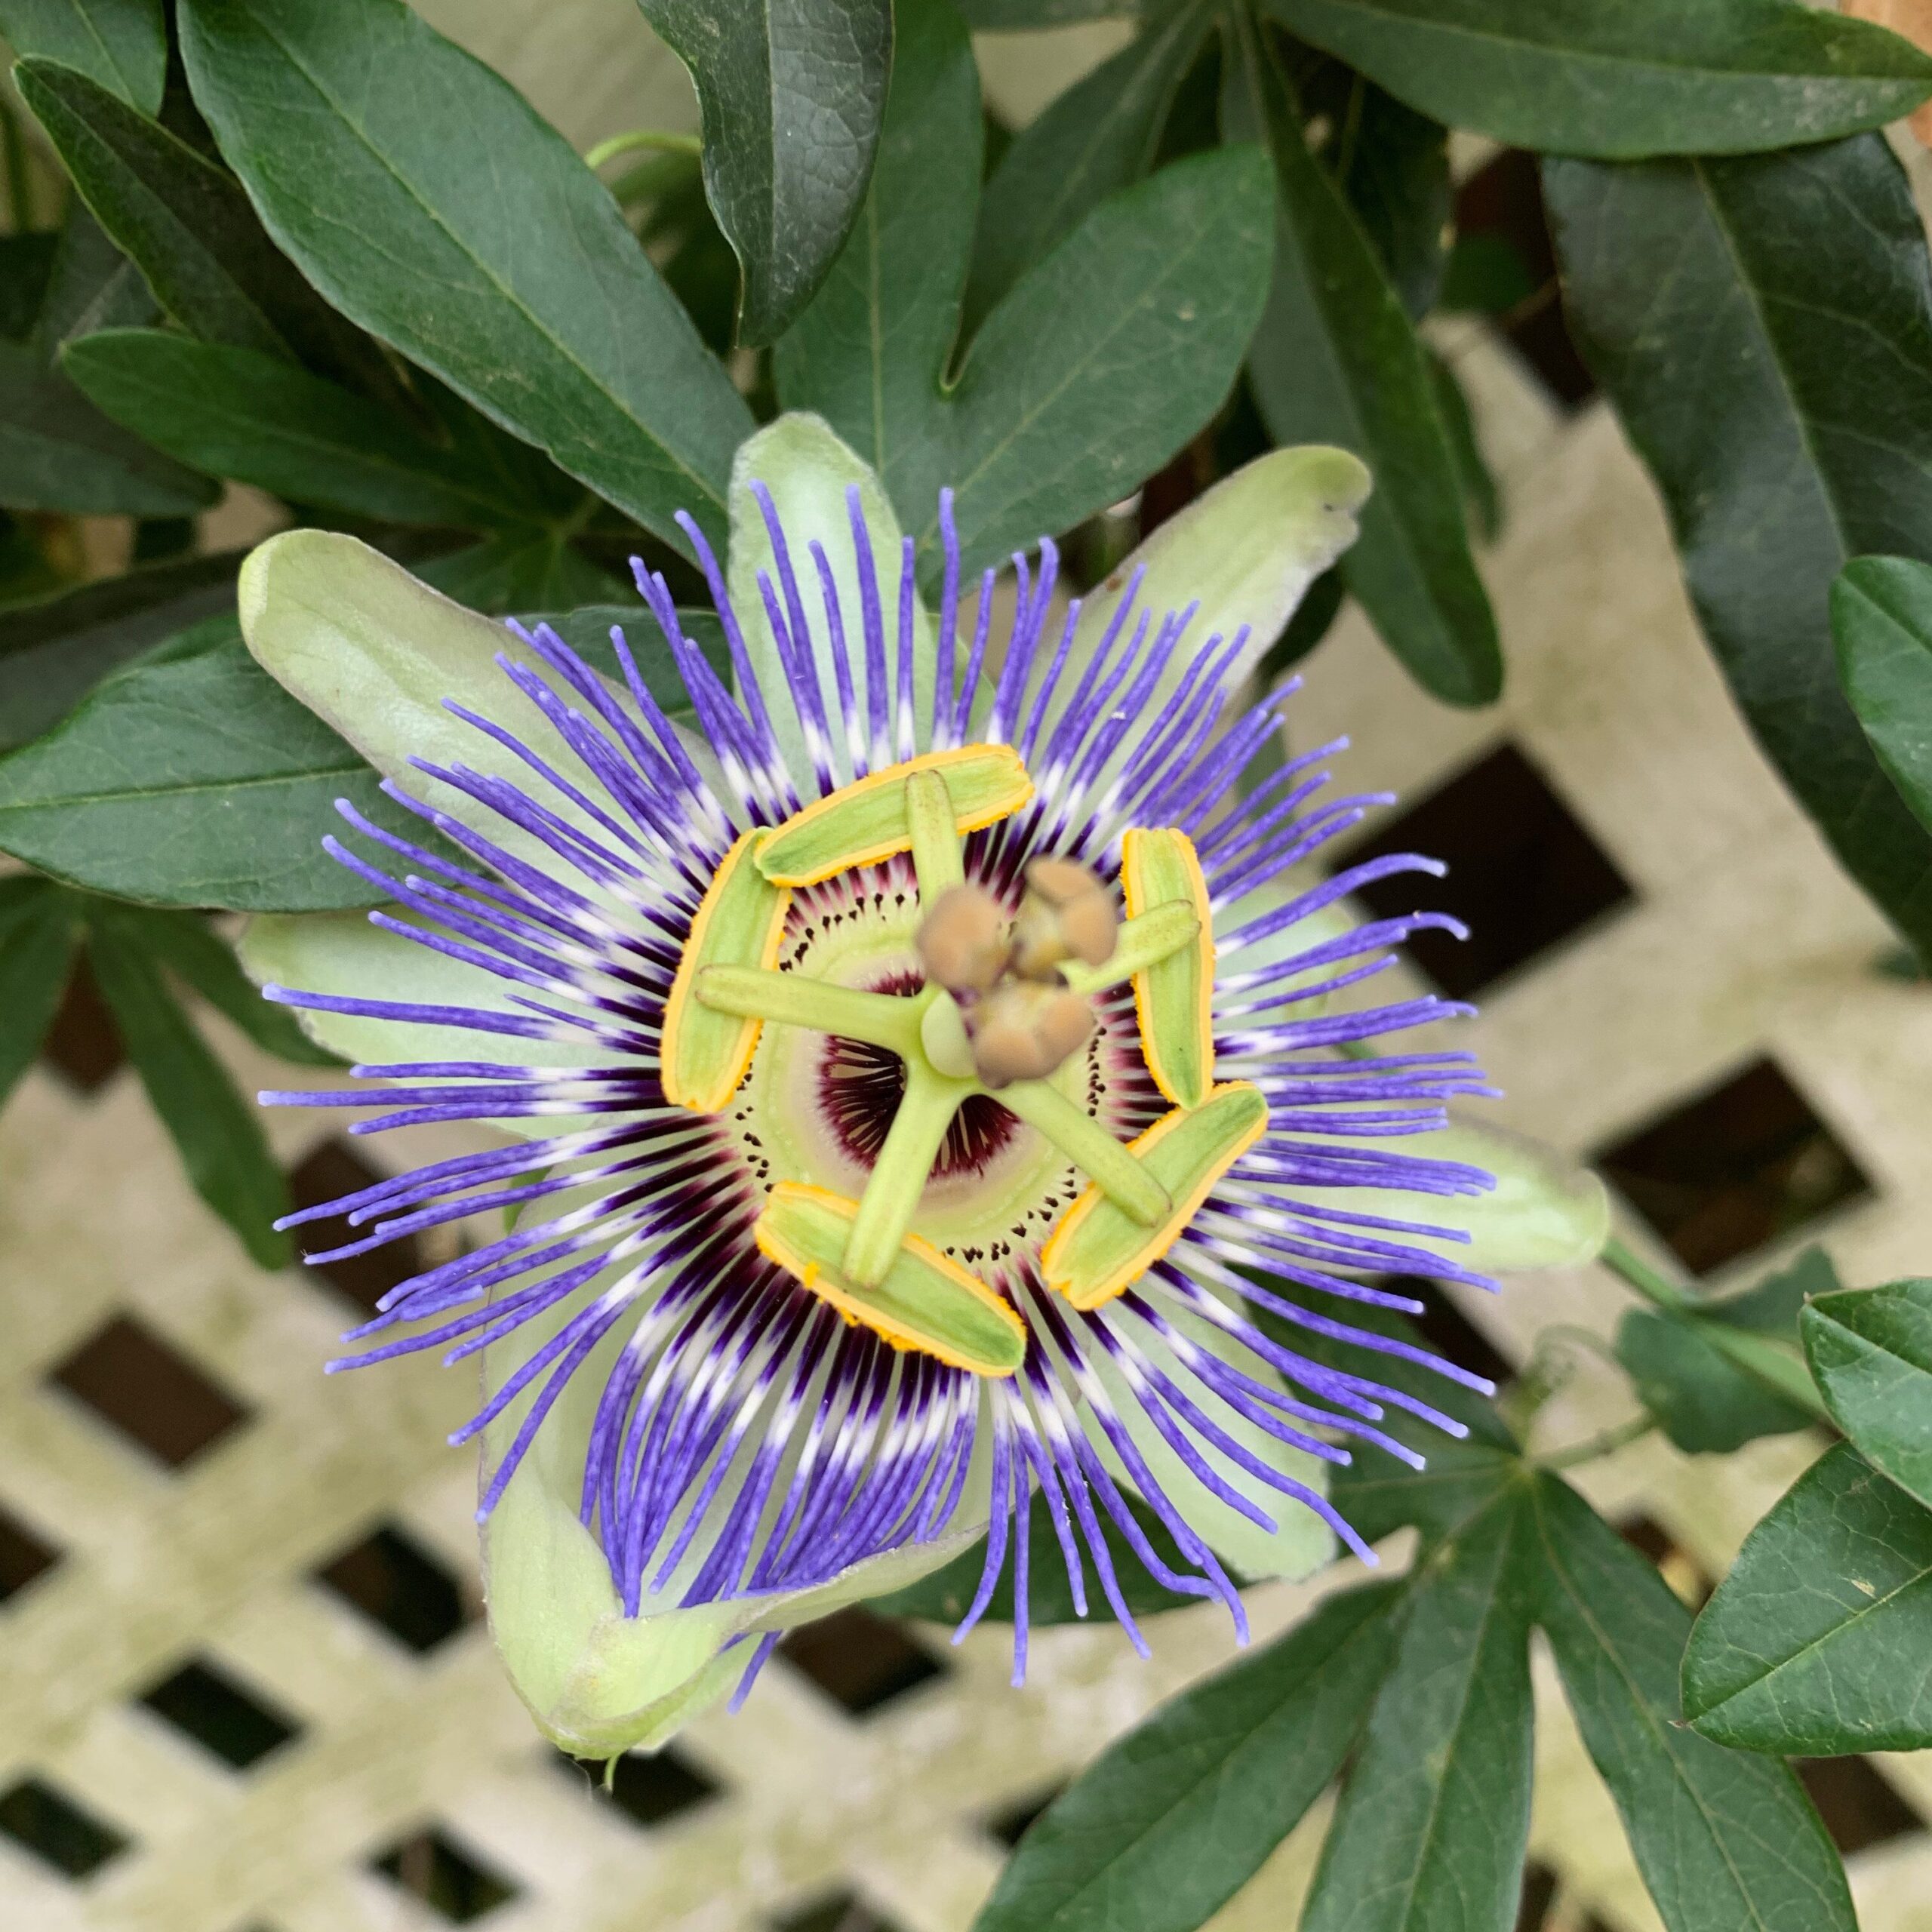
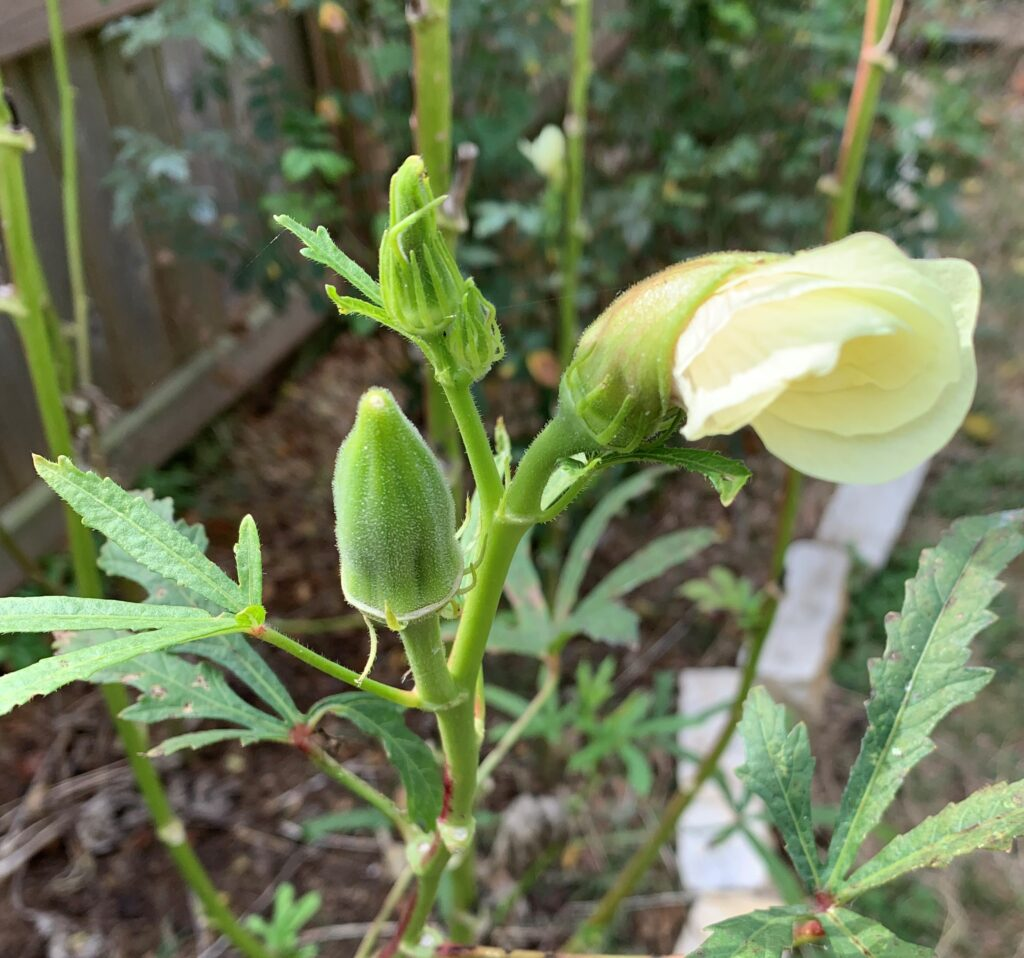
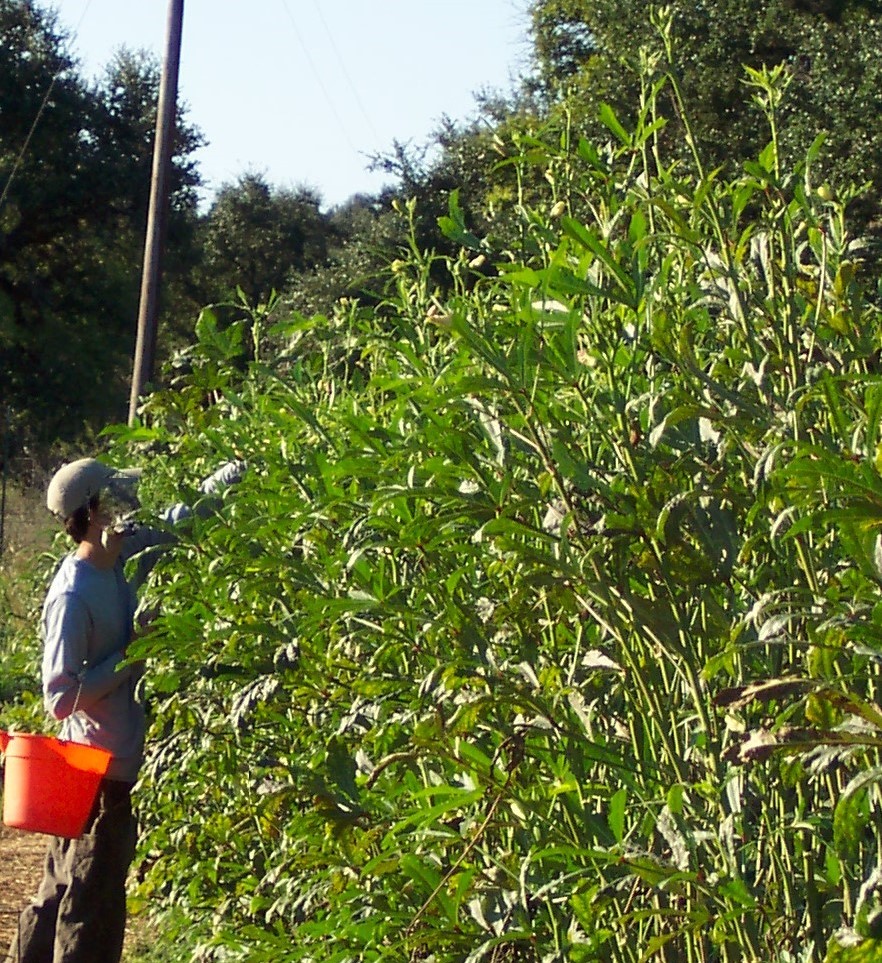
Okra is in the same family as hibiscus, cotton, and hollyhocks.  The blooms on an okra plant look just like hibiscus blooms.  The plants can grow to 6 feet or more and they will keep producing even in the heat of the summer which is a big bonus for those of us gardening in central Texas.  By the end of the summer, you may need a ladder to pick them.  You eat the seed pods, although some folks even use the leaves in recipes. 

Nutritional Value of Great Okra

Okra is a very nutritious vegetable, and the seeds within the tiny seed pods are very high in protein.  The mucilaginous substance within the pods is probably the reason for the second category of people.  Okra can taste really slimy. Those of us who are real aficionados eat it and love it any way, including slimy.  But if you don’t like the slime, there are many ways of cooking to get around that such as roasting, frying and in tomato-based recipes.

Okra is very nutritious and there are so many ways to cook it.  This photo shows a pile of fresh okra.
Okra is very nutritious and there are so many ways to cook it.

According to the USDA, a one-cup serving of okra has 33 calories, 3.2 grams of dietary fiber, Carbohydrate 7.45g, 1.2g Sugars, 2g Protein, 82mg Calcium, 57 mg Magnesium, 0.62 mg Iron, 299 mg Potassium, 61 mg Phosphorus, 7 mg Sodium, 0.58 mg Zinc, 0.109       mg Copper, 0.788 mg Manganese, 0.7 µg Selenium, 136 µg Vitamin A, 31.3 µg Vitamin K (phylloquinone) and 23 mg Vitamin C.

Growing Great Okra

Okra is relatively easy to grow if your soil is hot enough (between 68° and 95° F) and you don’t disturb its taproot.  It tolerates many soils, and since you have already improved your garden soil, you don’t have to worry about drainage or organic matter, right?  If you missed that lesson, look it up right here.

Okra should be harvested small.  Not as small as the one in this photo, but 2 - 4 inches is just about right.  This photo show a small okra pod and a bloom that is just opening.
Okra should be harvested small. Not as small as the one in this photo, but 2 – 4 inches is just about right.

Okra likes it hot.  As a matter of fact, it prefers the soil temperature to be above 80 degrees.  Not a problem here in Central Texas.  If you just must get your okra in the ground early, you can grow them as transplants, but remember that okra doesn’t like its roots disturbed. 

You can plant them in peat pots.  I don’t personally like peat pots because I have seen full grown plants whose roots never made it out of the pot.  I would suggest growing them in 4-inch plastic pots but don’t start so early that the okra becomes root-bound. When you transplant, ever so gently take the plant out of the pot, and put it in your nice warm soil.

Planting Okra in the Ground

You can also plant you okra seed straight into the ground and this is the decision with which the okra plants will be the happiest. Just plunk them in your improved soil 1 ” deep and keep them well watered.

You can grow green okra or red okra which is really pretty on the stalk, but it still turns green when you cook it. Okra seeds may not germinate easily. I haven’t always had this problem, but if you do, soak the seeds in water overnight and then plant.  Or you can nick the seed, but soaking seems safer.  Could this be why okra is also called lady fingers?  Nah, probably not.

Plant your little seedlings 2 feet apart.  They are going to need quite a lot of room. 

Okra can get quite tall -- over six feet tall.  Be sure to leave plenty of space for he okra to grow.  This photo shows a man picking okra that is probably 8-10 feet tall.
Okra can get quite tall — over six feet tall. Be sure to leave plenty of space for he okra to grow.

Harvesting Your Great Okra

They will start producing in about 2 months and then you will discover why our early pioneers had to be so sturdy.  Okra is spiny, and the little spines get into your skin when you pick the okra.  They aren’t so bad as cacti, but they’re bad enough.  If you are sensitive, wear long sleeves and gloves to harvest.  If you are tough, or want to prove you are, just head on in and you can pick the spines out later.  There is a “spineless” variety, Clemson Spineless, but “spineless” may be too much marketing.  This variety still has some spines.

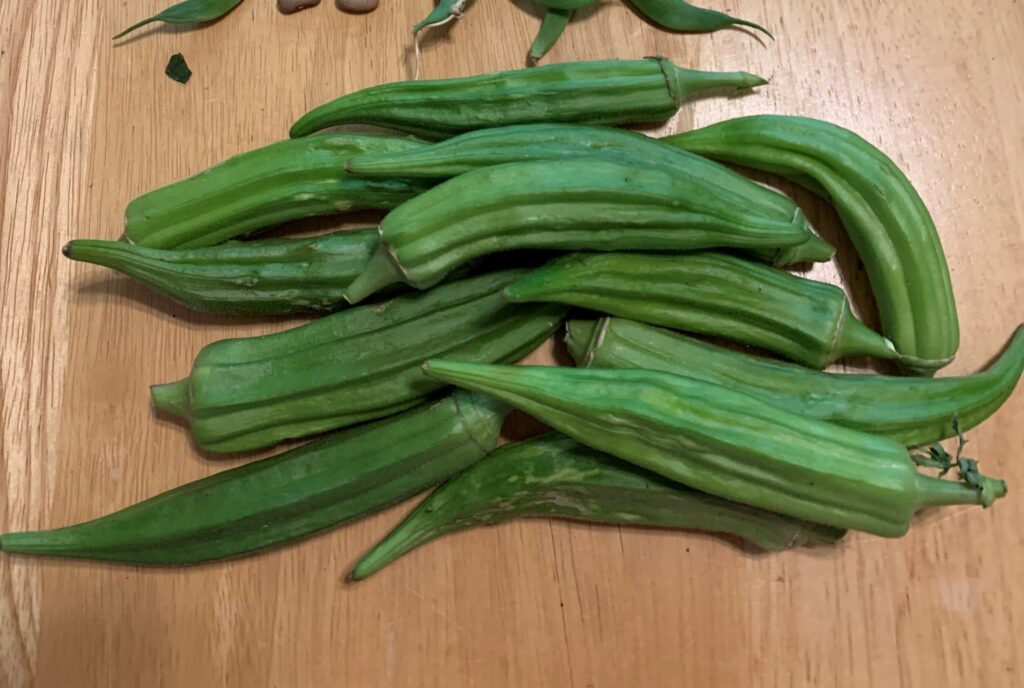
Like many vegetables that are the fruiting part of the plant, you want to pick okra when it is small.  When the pods are 2 to 4 inches they taste best.  The pesky pods often hide, especially if the leaves are plentiful.  If you miss one, and it gets bigger, that pod might be woody. 

OLYMPUS DIGITAL CAMERA

There are varieties that remain soft even when larger, such as Cow Horn, but they are the exception, not the rule.  If you don’t pick okra regularly enough, it will impact the future productivity of your plants.  Just like flowers that need to dead-heading, okra plants stop producing if the pods go to seed.

Okra Really is Good

Okay, now the fact I am in the first category of people is showing.  Okra is really tasty.  There are so many ways to enjoy okra – roasting, frying, boiling (or “burling”, as my Grammy used to say or did, she?  Maybe I’m just making that up.)  And you can even eat okra raw in salads.

It is so easy to toss some fresh okra with salt, and maybe a little lemon pepper, and stick it in the oven until it is toasty.  So good!

Whatever way you eat it, be sure to add okra to your garden.  It rewards you with beautiful blooms, and then tasty pods.  All for not much effort.  And it will fill holes in your garden from other vegetables that just couldn’t take the heat!

Leave a comment and let me know how you like your okra, or other growing tips you may have discovered.

Garden When It’s Hot

As I write this post, it is projected to be 104° this afternoon, and it has been over 100 for what seems like a million days already.  We just had our hottest May on record, and we’re halfway through a June of mostly 100° days.  It’s just plain too hot, but you can still garden when it’s hot. But our plants will need more care than ever.

Take Care of Yourself First

Taking care of your plants when it’s hot is only part of the situation.  Taking care of yourself is important too.  Be sure to keep your water bottle at the ready.  Wear a hat and sunscreen as a part of your gardening uniform. 

When it’s hot, garden early in the morning, or late in the evening to make it easier on your body.  Since it stays light until nearly 9:00, you can get a good hour or two in after the temperature starts to wind down, and the sun is not so hot.  Remember, if you get heat stroke, your plants will be left to fend for themselves.

Enjoy the Fruits of Your Spring Labors

The middle of the summer may not be the most fun time to garden but it is a time when you can enjoy the literal fruits of your labor from the spring season.  Now you can cut a bouquet of your zinnias, gladiolus, obedient plant and sunflowers to bring into your air-conditioned house.

Obedient plant blooms and zinnia blooms liven up your air-conditioned living room if you garden when it's hot.
Obedient plant blooms and zinnia blooms liven up your air-conditioned living room.

Early in June, you can bring in the last of your spring tomatoes, your onions, your beans, the first of your peppers, and maybe if you’re lucky some squash and cucumbers.  Later in the summer, you may have to pull up some plants that have waned or plant new things.

Gardening when it's hot means a lovely harvest of tomtoes and peppers.  Of course, the birds have to take their share as shown by the bites in the tomatoes.
Summertime means a lovely harvest of tomtoes and peppers. Of course, the birds have to take their share.

Texas’s Dormant Season

I like to think of mid to late summer (July through September or even October) as our dormant season.  Up north, people have the winter as a dormant season and they tend to spend more time indoors than in the garden.  In Texas, late summer when the temperatures are sure to climb into triple digits, we tend to spend more time indoors. 

Plan on a lag in your garden for this time period.  Plants can’t go inside and sit under a ceiling fan in an air-conditioned room to cool off.  The heat is going to make a difference in how they grow.

Heat Stress in the Garden When It’s Hot

Gardening when it’s hot means it’s time to look out for heat stress. Most plants will not suffer when the temperatures are up to 90°.  Over 90° they will begin to suffer.  Central Texas has daily high temperatures over 90° for several months running.  July, August, September and some years even October can spend hours a day over 90°. 

Some plants react when it’s hot by dropping leaves. Plants give priority to their new growth when moisture or heat begin to stress the plant.  That’s why the older leaves show damage first.

Other plants react to any stress from high temperatures or low soil moisture in other ways. Sometimes, plants or their fruits are misshapen. On eggplant or cucumber plants, it will lead to bitterness in the fruits. If the fruits turn bitter, it’s time to pull the plant and put it on the compost pile because all future fruits will be bitter as well.

Taking Care of Your Garden When It’s Hot

To help your little babies live through the heat, be sure to keep them well-watered but not over-watered. Water deeply and regularly.  Deep watering is very important.  Check to make sure you are getting the water to go to at least 6 inches deep in the soil or run out the hole in the bottom of a pot.  Shallow watering will cause roots to die back to where there is a water supply.  Watering deeply leads to longer, more dense roots.  Watering deeply will also wash any excess salts below the level of the roots so that the increased salinity from evaporation does not damage the plants.

Water only when the soil dries out.  Overwatering will not help and can kill by cutting off the supply of atmospheric gases that the plants use from the soil.

Gardening when it’s hot means now, more than ever, it is important to keep the soil in your garden covered with cardboard and mulch as described in my post “The Best Method Ever to Deal with Weeds”.  This both shades and cools the roots of the plants so that they can keep up their vigor.

Locusts love it when this garden is hot, and this is the time to watch out for them.  Don't use insecticides.  Use other more appropriate methods.
Locusts love it when this garden is hot, and this is the time to watch out for them.
Don’t use insecticides, though. Use other more appropriate methods.

This is also a time to keep a lookout for bugs feasting on stressed plants. Pick off those that you can, and use methods appropriate to the bugs you are seeing. Find out more in Get Rid of Bugs Organically.

Container plants can suffer the worst during the hot months.  Because the volume of soil is limited, the heat to the roots can equal the heat to the plant above the soil.  Combine that with the tendency to dry out more quickly, and plants are in danger of dying.  Be sure to keep your container plants well-watered but remember they can drown, too.  Water them well, but don’t overdo it.

Use “Southern” Plants and Native Plants When It’s Hot

This is a time of year when some plants excel.  There’s a reason that squash and okra are the iconic southern vegetables.  Summer squash is happy in the heat and it may be the best time to beat the squash vine borers.  Okra will keep going through the heat providing you with plenty to cook all summer long.  This is also a great time for peppers that have some shade.  I’ll cover squash, squash vine borers and okra in other posts. 

This late summer harvest includes okra, tomatoes, green cucumbers and lemon cucumbers.  These Green Zebra Tomatoes do well in the heat, and the lemon cucumbers did better than the green cucumbers.
This late summer harvest includes okra, tomatoes, green cucumbers and lemon cucumbers. These Green Zebra Tomatoes do well in the heat, and the lemon cucumbers did better than the green cucumbers.

Native plants will come though the hot months most easily.  These plants have spent thousands of years adapting to this climate with ways to protect themselves from the heat.  Native plants lose moisture from their foliage more slowly and are more efficient feeders from the soil.  Try some new sooon-to-be-favorites from Native American Seeds. This is why plants that are not native are so susceptible to dying during the hot months.  They do not have the adaptations that protect themselves.

Asclepias, or Tropical Milkweeds, Bloom When It's Hot.
Asclepias, or Tropical Milkweed, Bloom When It’s Hot.

Many flowers such as zinnias and coneflowers thrive in spite of the heat.  Be sure you keep dead-heading any flowers to keep them blooming throughout the summer. But don’t go so far as to prune your plants.  Let that wait until temperatures cool down.

Zinnias provide nectar to butterflies such as this Monarch when it’s hot.

To Garden When It’s Hot, Take It Easy

When it’s hot is not the time to prune, transplant or fertilize.  All of these activities stress plants, and the heat is stressing your plants enough. 

Fertilizer can only be taken up at optimal temperatures so applying it during the highest heat days is just a waste. Overfertilizing can raise the salinity of the soil which can kill off the microbes in the soil or if the level of salinity is high enough, it can kill your plants. 

Remember, the soil is taking care of your plants so you must take care of the soil.  High temperatures reduce root growth, and with fewer roots, there is less uptake of fertilizers.  High temperatures also bind elements within the soil so that they cannot be taken up.

Garden When It’s Hot and Enjoy Your Summer!

Use the above tips and enjoy your summertime, even if you have to hide from the heat in the afternoons.  Gardening when it’s hot is a great time to garden if you plan your garden accordingly.

Build a Better Soil

The Real Dirt on Dirt

Dirt is so undervalued!  We hate dirt in so many senses – dirt on our clothes, dirt under our fingernails, dirt on the kitchen floor.  When we think of dirt, our first reaction is probably, ick, I’ve got to get this off of me as quick as I can.  We don’t like to be dirty.  Still, everything we eat comes from dirt, or the more polite way to say it is soil.  That stuff under your feet is so much more than just dirt. Build better soil to turn the dirt underfoot into productive garden soil and glorious gardens.

Add Organic Matter to Build Better Soil

We need the soil in the garden to contain as much organic matter as possible.  Organic matter is the magic component that builds better soil and helps plants to grow. Another post will cover the many different ways organic matter does that. 

We can add compost, and should, but it is definitely not once and done.  As much as 90 % of organic material disappears as it decomposes.  You need 10 pounds of organic material to end up with one pound of organic matter left to help out our plants.  So add organic matter, and keep adding it to keep up the percentage of organic matter in your soil.

You can think of organic matter as a sponge in the soil, because organic matter is able to hold up to 90 percent of its weight in water. That is like water in the bank for your thirsty plants, and it releases the water as the plants need it. 

The Building Blocks of Dirt

In addition to organic matter, there are three basic mineral building blocks in dirt.  These are clay, silt, and sand.  These three building blocks are very different sizes.  Although the sizes pf each block differ from one another, they can vary quite a bit even within their type.

Comparing the average size one to another, if a particle of sand was the size of a basketball, then silt would be the size of a baseball, and clay would be the size of a marble.

This is an image comparing the sizes of sand, silt, and clay together. The basketball represents sand, the baseball represents silt, and the marble represents clay.

An ideal soil would have equal parts sand, silt, clay and organics matter.  The kind of soil you already have determines what you need to do next to build better soil. 

Try This Soil Experiment to Build Better Soil

A good way to tell what kind of building blocks you have, and what steps you will need to take to build better soil, is to put two cups of soil in a quart jar.  Then shake up the jar.  Put the jar on a table, and check your jar after one hour, two hours, and overnight.

If you have sandy soil, the sand will fall quickly to the bottom even as soon as one hour.  If you have a lot of silt in your soil, it will be the next layer. Both the sand and silt will have settled out within six hours.  Clay stays suspended in the water the longest period of time and when it settles, the clay will be the top layer.

Grammy’s Experiment

I tried the soil experiment with the following five soil samples:

  1. Some dirt I dug up from a roadside in Salado Texas.
  2. Some dirt that I gathered from under a bridge near the San Gabriel River.
  3. Some dirt I dug up from the side yard where I haven’t been gardening.
  4. Dirt that I had sifted out of some pebbles that had been laying out in the yard on a tarp. 
  5. My vegetable garden soil that I have been working to improve for 5 years,

Here they are just after I shook the jars up.

The five soil samples after I had just shaken them up.

You can tell a lot even before the soils have settled.  From left to right, the soils get darker and darker.  That means the organic content has gone up dramatically as you look to the right.

Results of Soil Experiment

Here they are the next morning.

Here are the five jars the next morning after the soil had settled.

Each soil sample looks very different after the period of setting.  You can see the color darkens, as I mentioned before. Zoom in to look closer so you can see the differing sizes of the particles in the soil.

Sample 1: Roadside near Salado, Texas

This jar shows the results of the on the sample from a roadside near Salado, Texas.
This jar shows the results of the sample from a roadside near Salado, Texas.

Much of Central Texas is clay soil, but you can see that the soil I dug up near Salado has a lot of sand in the bottom, and silt on top of the sand with a very thin layer of clay on the top.  You can see some grass that was on top of the soil and is now floating on top of the water, but in general, the level of organic matter is very low as shown by the light, sandy color.

Sample 2: Under Highway 95 Bridge over the San Gabriel River

This jar shows the results of the soil sample from under the bridge over the San Gabriel River.

Under the San Gabriel bridge, there is a little bit of sand with a larger layer of silt, but the thickest layer is the clay on top.  I could tell there was quite a bit of clay because as I dug the soil up, it really stuck together in clumps, which is one of the characteristics of clay.  After all, they use clay to make dishes and pots.

Sample 3: Soil from Unimproved Part of Grammy’s Yard

This jar shows the results of the soil experiment on the sample from an unimproved part of the yard.

The unimproved soil from my yard shows quite a bit of sand at the bottom, and the clay on top.  I was surprised by this finding because it seemed pretty much like pure clay to me.  The soil may have been changed by building materials near the house.  You can also see a very thin layer of organic matter on top of the clay, and also floating in the top of the jar.  Organic matter is lighter than water because it is more porous than the mineral components.

This shows where my garden soil started before I worked to build better soil.

Sample 4: Soil Sifted from Pebbles in Grammy’s Backyard.

This jar shows the results for the soil sifted from pebbles laying on a tarp in the backyard.

The soil sifted from pebbles which had been laying on a tarp out in my yard shows lots of organic matter floating at the top.  This is from leaves falling from the hackberry trees.  It also shows a layer of sand in the bottom, probably from the breakdown of the pebbles into sand.

Sample 5: Soil from Five-Year-Old Vegetable Bed

This jar shows the results of the soil experiment on the sample of soil from Grammy's five-year-old vegetable bed.
This jar shows the results of the soil experiment on the sample of soil from Grammy’s five-year-old vegetable bed.

The soil experiment shows my five-year-old vegetable bed had about 1/3 of the solids in the form of organic matter floating at the top, about 1/6 of the solids as clay, and the rest is sand.  That is a nice composition for a garden bed.  You can also tell that soil has lots of organic matter because it is a deeper color of brown than roadside and under the bridge samples.

I started this vegetable bed five years ago on top of an old driveway that had been covered with decomposed granite, so that is the source of the sand.  To build better soil, I added compost, horse manure, cardboard and mulch for the five years.  I use cardboard and mulch as a weed suppressant, as described in an earlier blog post “The Best Method Ever for Dealing with Weeds,” but it has the secondary benefit of adding organic matter to the soil.

Steps to Build Better Soil

The soil experiment showed me that I really had made progress.  All that compost and mulch and cardboard had resulted in better soil. Although the soil looked and much better, the experiment made that so much more real.  My soil started with pretty much 100% clay soil on top of the decomposed granite.  I could barely plant my first tomatoes because it was so hard to shovel out a hole. So hard, I even took a pick ax to it.  Now it is visibly much fluffier, and that fluffiness shows up in the soil experiment as all that organic matter floating on top of the water.

Are you ready to do your own experiment?  Let me know how it goes and what you will do to build better soil!

My Six Favorite Garden Tools

This post contains affiliate links. That means that if you make a purchase after clicking on a link I may earn a small commission at no extra cost to you. For more information, click here.

My six favorite garden tools make my gardening time easier, more efficient and more pleasant. Some of these reduce trips back and forth to get what I need. Some of them make weeding easier. Some prevent me from having to bend over. All of them have been proven through many hours in the garden.

Triangular hand tool

Making short work of weeding and digging small holes is why this triangular garden tool is one of my favorites.
Making short work of weeding and digging small holes is why this triangular garden tool is one of my favorite garden tools.

I found this tool at Walmart years ago.  For some reason, they don’t carry it anymore.  It is the best hand weeder I have hands down and can dig up roots in the ground that are stuck like a baby on a mama.

Maybe this Japanese Weeding Sickle would work well as a substitute.  I’m going to order one and give it a try.

Will this weeding sickle become one of my new favorite garden tools?

Collinear hoe

This collinear hoe keeps my back from hurting and that is a big plus when weeding.

This collinear hoe works so well you almost don’t mind weeding (remember I said I liked hyperboles).  To use, you hold it like you are holding a broom. In this position, you stand up straight so that your back doesn’t feel like a freeway loop.  Not weeding at all is my all time favorite described in an earlier blog post but this is a close second. Like any weeding that you do, you want to get those little suckers when they are as small as possible. Do as I say, not as I do.

Utility Knife Box Cutters 

Cutting up cardboard is one one of the uses of this favorite garden tool -- the utility cutter.
Cutting up cardboard is only one of the uses of this favorite garden tool — the utility cutter.

I keep one of these utility cutters in my tool apron at all times.  I use it to cut up cardboard to fit the shape of my garden beds.  I can also use it to cut string, or even a stubborn weed I am trying to eradicate.  I also use it to cut a squash stem and get out the vine borer so that the plant can recover (with a lot of hope). 

I found myself struggling to cut a box today and then I remembered.  After many uses, it gets dull.  Just break off a section of the tip of the blade to get to a new sharper part. It’s like you have a brand-new blade.

Sit upon Bucket

I find so many uses for buckets.  When I go out to work in the garden, I bring one along for trash, one full of weeding and planting tools, and one for the green or brown stuff we’ve pulled up out of the beds that we’re going to dump in the compost pile.  I have a bucket for potting soil and one for compost.  Also, I have a bucket for mulch and one for coir (I use coir to start seeds.)

My sit-upon bucket.  With it's cushioned lid, I can work in comfort and with no bending over.
My sit-upon bucket. With it’s cushioned lid, I can work in comfort and with no bending over.

This bucket lid is an improvement on the bucket idea.  I don’t like bending over.  Just ask my grandsons.  Grammy doesn’t like bending over.  So, any chance I get, I figure out a way to sit down.  These lids, which fit any old five-gallon bucket you can find laying around, is the berries for turning something free (or nearly) into a very convenient sit-upon.  One big advantage for the bucket (as opposed to other sitting devices I have in my garden) is that you can take it into the middle of a big ole bed and not squish any important little plants in the meantime.

Children’s Garden Tools

I discovered how wonderful children’s garden tools are when I co-opted the tools I got for my grandsons’ play.  They soon became some of my favorite garden tools.

My favorite garden shovel -- small and to the point. (photo credit: lea bowman)
My favorite garden shovel — small and to the point. (photo credit: lea bowman)

A big shovel is fine for the jobs that it is fine for, but this small one is so light that I keep it in my bucket of tools that I drag around the yard to have handy.  I like it for planting out new plants.  It makes a good-sized hole for up to 1-gallon-sized plant containers. 

Small and yet just the right size to do a lot of work without using a lot of energy.  All the attributes of a favortie garden too. (Photo credit: lea bowman)
Small and yet just the right size to do a lot of work without using a lot of energy. All the attributes of a favorite garden tool. (Photo credit: lea bowman)

The rake is great for sorting through all the debris on top the soil and leaving only soil behind.  I used it a lot when we were making new garden beds in a place that had been just Bermuda grass.  After pulling the sod up, this rake could get the little pieces.  It works great from a sitting position on my bucket seat.  And the hoe works well as a grabber of things in addition to weeding.

Garden Apron 

My well-loved and well-used garden apron.  It is like a tool chest you can wear.
My well-loved and well-used garden apron. It is like a tool chest you can wear.

I got this apron a while back (as you can tell from the ground in dirt.)  I modified it a bit on the sewing machine.  I added the pocket up on my shoulder for my cell so it is conveniently out of the way of dirt and water and maybe I’ll be able to hear text dings.  I also added elastic at the waist so I didn’t have to tie the strings. 

Then, I divided one of the pockets into three parts for putting scissors, clippers and my box cutters. Because these divisions are small, the tools stand up making it quick to find them.

In the bigger pocket, I keep clips to tie up tomato or other vines, string, or irrigation repair parts depending on the task for the day.

I also lowered the neckline in the front and the back to allow a little more airflow for those hot days of summer.  Easy to do and then the apron is able to keep all my implements at the ready as I putter through the garden. 

With these six favorite garden tools at the ready, gardening is easier and less stressful.  And we’d like to keep our gardening as stress-free as possible because that’s the whole point, right? I hope some of these tools will make gardening easier and stress-free for you too! Let me know how you use them!

Three Must-Know Terms:  Annual, Biennial and Perennial

This post contains affiliate links. That means that if you make a purchase after clicking on a link I may earn a small commission at no extra cost to you. For more information, click here.

As a gardener, you will want to know the difference between annual, biennial and perennial plants.  Why are these terms important?  Whether a plant is an annual or one of the three types perennials makes a big difference in when and where you plant them in your landscape.  If you are looking for a plant to keep its look during the winter, you want an evergreen perennial.  If you plant to move plants around from year to year, you want an annual.  The distinction between types of plants gives you information on when and where to plant, and how to care for your acquisitions. 

Annuals

Annuals are plants that complete their life cycle within one year.  That means they grow from a seed, into a mature flower, set fruit that contains a new seed, and then die within that year. Some common annuals are vegetable plants like radishes and cucumbers, or flowers like bluebonnets, zinnias or pansies.

Bluebonnets, an annual, are the state flower of Texas and beloved by all who see their annual show. This one is just barelly beginning to bloom.

Biennials

Biennials complete their life cycle in two years.  This type of plant sprouts from seed and grows into a plant in the first year.  In the second year, they flower, set seeds, and die.  Onions are this type of plants, as well as parsley, artichokes, foxgloves and hollyhocks.

A Black Swallowtail caterpillar devours a blooming parsley.  Parsley is a biennial.
A Black Swallowtail caterpillar devours a blooming parsley. Parsley is a biennial.

Perennials

Perennials are the longest lived of the annual, biennial and perennial plants. Perennials live more than one year.  Some live 3-5 years, and some live up to 50 years or more.  This category is further subdivided into herbaceous, deciduous and evergreen perennials.  

Herbaceous perennials die to the ground during the wintertime and then grow back the next spring.  In central Texas, Asclepius tuberrosa or tropical milkweed is a herbaceous perennial.  If you’re lucky enough to know someone with one of these plants, you can grow them from seeds.

Asclepias, or Texaas Milkweed, is the larvael food of the Monarch butterfly and is a herbaceous perennial.  Although it dies to the ground after the first freeze, it comes up from the roots in the spring.
Asclepius tuberosas or Tropical Milkweeds, along with other milkweeds are the larval food of the Monarch butterfly and are herbaceous perennials. Although it dies to the ground after the first freeze, it comes up from the roots in the spring.

Deciduous perennials lose their leaves during the winter, but regrow their leaves in the spring.  Oak trees and beautyberry bushes are two examples. 

Evergreen perennials keep their leaves all through the winter. Irises and rosemary plants are evergreen perennials.

Growing Zone Differences

Notice I said “in Central Texas”.  Your growing zone makes a difference for many plants whether they are herbaceous or evergreen, and can even make a difference in whether a plant is an annual, biennial or perennial plants.  For example, here in central Texas, lantanas are herbaceous perennials.  Further south, they are evergreen, and further north, they are annuals.  Hibiscus and bougainvillea are annuals here, but further south, they are perennials. Here, tomatoes are considered an annual but further south, they are perennials growing year-round.

Are Vegetables Annuals, Biennials, or Perennials?

Vegetables can be annual, biennial or perennial plants. Most vegetables are annuals.  Corn, tomatoes, broccoli, okra, cucumbers, watermelons, and beans are all annuals.  Even though most vegetables are annuals, some are perennials.  Artichoke, asparagus and rhubarb are examples. 

And many fruits are perennials. Blackberries, raspberries, figs, and peaches are all perennials.

Blackberries are perennial.  They only set fruit on one year canes, meaning the canes that grew the summer before.  After you've picked all the fruit, you can cut down last year's canes.  They will never fruit again, but the new canes will.
Blackberries are perennial. They only set fruit on one year canes, meaning the canes that grew the summer before. After you’ve picked all the fruit, you can cut down last year’s canes. They will never fruit again, but the new canes will.

Which are Better:  Annuals, Biennials, or Perennials?

Being lazy by nature, when I have to choose between an annual, biennial or perennial, I tend to choose a perennial. I really like perennials because you don’t have to replant them every year.  You have a lot of plants you can count on to come back year after year.  Until they don’t come back.  I have lost plants because of an especially cold winter even though they are usually an herbaceous perennial.  Or sometimes a perennial will just die.   Chalk that up to the 500 dead plant count you need to become a “master gardener”. 

Wild Bergamot is a beautiful blooming perennial herb.  Add one to the garden where it can spread out.  When you have enough, share your bounty with your friends.
Wild Bergamot is a beautiful blooming perennial herb. Add one to the garden where it can spread out. When you have enough, share your bounty with your friends.

It is usually best to plant perennials in the opposite season from when they bloom.  For example, irises bloom in the spring, so it is best to plant or divide them in the fall.  Asters bloom in the fall, so divide or plant them in the spring.

Perennials will not be at their best when you plant them.  I’ve heard the saying many times that in the first year, perennials sleep.  In the second year, they creep.  In the third year, they leap.  Sometimes you’re just about to give up on a plant when it is just about to leap!  And be sure to leave enough space for the expected size of the perennial because you don’t want to have to move it just as it is reaching its prime because moving it probably will set the plant back a bit.

Advantages of Annuals

On the other hand, annuals have advantages too. One advantage of many annual flowers is that they bloom for a longer period of time than perennials. So, I also have some annuals in my garden.  But in general, I try not to have to plant a lot of annuals to keep the garden looking lovely. 


Cosmos are an annual, but they reseed vigorously so you won't have to replant them every year.  You might have to pull a few that end up where you don't want them!
Cosmos are an annual, but they reseed vigorously so you won’t have to replant them every year. You might have to pull a few that end up where you don’t want them!

Some annuals, like the Cosmos plant, reseed so vigorously, they almost become weeds. If I have to pull weeds, I’d rather they be of pretty plants than of plain old weeds. Unless they grow using rhizomes. Then, they are a bother. For more on weeds, take a look at this post.

Annuals have the advantage that since they only live one year, you can plant them in one place and then decide to change to another place next year.  This year, I wanted to plant my tomatoes in a new place because I wanted to rotate where they were planted for good crop rotation.  I planted some of my tomatoes between my rose bushes.  I didn’t have to commit to planting tomatoes there year after year.

Perennials that Flower

I prefer flowers whenever I can have them, so I plant perennials that bloom in most cases.  By having a variety of different perennials with differing seasons of blooming, I can have blooms most times of the year. Irises bloom in the spring, wild bergamot in the late spring, obedient plant in the summer and Mexican bush sage in the fall.

This is a Gaillardia plant.  This one is a perennial, but some varieties are annuals.

Caring for Perennials

Perennials are not care-free, however.  Some perennials do best if you divide them every few years.  Irises are an example.  They are evergreen perennials. Because the rhizomes require sunlight to bloom, they can get so crowded that they don’t bloom well.  When that happens, they need to be dug up and spread out to ensure a good bloom.  Some perennials can be pruned to keep them healthy and growing.

My Obedient Plants, not very obediently, spread at a rate faster than my limited garden space can allow.  I have to dig up many baby plants and give them away or compost them so that I can plant some other things.


Obedient plant is a perennial, even though not very obedient,  It spreads quickly and can take up quite a bit of space.  It does make a pretty bouquet however.  Here it is with zinnias – a perennial with an annual.
Obedient plant is a perennial, even though not very obedient, It spreads quickly and can take up quite a bit of space. It does make a pretty bouquet however.  Here it is with zinnias – a perennial with an annual.

Another not so obedient perennial is Greg’s Mistfloweer.  I love the purplish blooms and so do the Queen butterflies as well as many other butterflies, but this vigorous spreader grows in all directions, including between and past my border rocks and into the pathways.  It’s starting to sound like I have a lot of vigorous spreaders! Oh, well, they are a dependable source of give-away plants.

This is an American Lady butterfly feeding on a Gregg’s Mistflower, which is another herbaceous perennial.

The next time you are in the nursery, you are sure to see signs saying annual or perennial.  Pick out the plants that best fit your needs.

Get Rid of Bugs Organically?

This post contains affiliate links. That means that if you make a purchase after clicking on a link I may earn a small commission at no extra cost to you. For more information, click here.

The first question I am always asked about organic gardening is what to do about the bugs. How can you garden organically without bugs? How can I get rid of bugs how can I get rid of bugs organically that are bugging me?

The most important thing we should all know about bugs is that 97% of them are beneficial (that’s the estimate I’ve always been told.)  That means only 3% of the bugs cause every annoying bug problem in our garden!

Bugs are Good

The other 97% of bugs do good things for our garden.  We dont want to get rid of the bugs even organically. Bugs pollinate our plants so that we have fruits.  Bugs kill other bugs that kill our plants.  They dig up the soil making it more suitable for growing things, and making nutrients available to those things.  Bugs carry away the remnants of dead plants, and clean up stressed plants either because of the wrong season, location, or some other stressor. 

A bee pollinates a blue salvia. We don't want to get rid of this bug organically that pollinates flowers!

A Bee Pollinates a Blue Salvia. We don’t want to get rid of this bug that pollinates flowers!

Bugs are beautiful and useful. One of our favorite bugs, butterflies, can sip nectar, gather pollen, and please our senses.

A Monarch Butterfly sips nectar from a zinnia. We don't want to get rid of this bug even organically!
A Monarch Butterfly sips nectar from a zinnia. We don’t want to get rid of this bug even organically!

If you want to have a crookneck squash to eat . . . You can't get rid of all bugs.
If you want to have this . . .

You have to have a bee pollinating the squash blossom to have a squash to eat.  You don't want to get rid of this bug organically!
You have to have this . . .  You don’t want to get rid of this bug!

Pesticides are Bad for Humans

Many times people have the mindset that we must conquer those boogers that are eating our plants or causing us problems.  Out come the pesticides.  Mosquitos bite us, roaches are gross, ants bite us, beetles must be bad by association, right?  How can I get rid of the insects that are bugging me organically? We must kill them all!  

The “kill them all” or the “how can I get rid of bugs organically” mindsets sells lots and lots of pesticides and keeps many pest control companies in business.  Pesticides put lots of poorly tested chemicals in the air and in the soil.  Researchers found 13 of 14 biomarkers of contemporary pesticides in measurable concentrations in more than 50% of urine samples, indicating widespread exposure. 

These chemicals can hurt us as humans even as we try to kill all the bugs.  Using chemical pesticides is harming our health in many ways both known and unknown.  Prenatal exposure to organophosphate pesticides has been associated with impaired child development. What other effects are all those pesticides having?

Pesticides Can Cause Microbes to Die

One result of trying to get rid of all the bugs is that it kills microbes unintentionally.  The microbes in the soils are really important!  According to Young and Crawford in Science magazine, one handful of garden soil can contain more organisms than the number of humans who have ever lived: 1 trillion bacteria (10 to the 12th), 10,000 protozoa, 10,000 nematodes and 25 km of fungi!  All of those little guys are spending their lifetimes working to create the soil that grows the food that sustains us.

Pesticides Kill Good and Bad Bugs Alike

Beneficial insects die when you use the “kill them all” or “get rid of the insects that are bugging me” approach.  As I said, 97% of them help us!  If you use a non-selective pesticide, whether it is chemical or organic, you are killing off a bunch of bugs that are beneficial.  Note that this is true even when you use an organic pesticide.  Unless you use a pesticide aimed at one specific pest, you will kill beneficial insects.

Not only that but you are allowing the pesky bugs to proliferate because you are killing off the insects that eat the pesky ones.  It is much better to deal with bugs another way.

I took this photo I took at my farm in Uvalde County.  The caterpillar is munching on an antelope horns milkweed.  Val Bugh who wrote a guide called Butterfly Guide for Central Texas said: “Oooh, that is a gorgeous caterpillar! It is a dark color phase of the Queen (not very common). Usually they do not have such wide dark markings and they are not usually that light in color. Both Monarchs and Queens can be quite variable in the amount of dark vs. light banding.”   We don't want to get rid of this bug organically!
I took this photo I took at my farm in Uvalde County.  The caterpillar is munching on an antelope horns milkweed. Val Bugh who wrote a guide called Butterfly Guide for Central Texas said: “Oooh, that is a gorgeous caterpillar! It is a dark color phase of the Queen (not very common). Usually they do not have such wide dark markings and they are not usually that light in color. Both Monarchs and Queens can be quite variable in the amount of dark vs. light banding.”  We don’t want to get rid of this bug!

Get Rid of Pesky Bugs without Using Pesticides

To manage pesky insects (remember this is only 3% of the insects), start with healthy soil.  Insects tend to attack stressed plants because they are too dry, too wet, too hot, too cold, or lacking in the nutrients they need.  If a plant is very healthy, insects go looking for another plant.  You discourage just the kind of bug you don’t want. 

Begin with creating maximum health of plants starting from the soil up. Refer to my “Begin Here” post on how to do this.

Some bugs only seem pesky.  Leaf miners, for instance, chew through leaves, but they don’t kill the host plant and cause little damage other than cosmetic.  Using a wide-spectrum pesticide to try to eradicate this bug ends up doing a lot of damage for very little benefit.

Now I admit, when I’ve just been bit by a fire ant, I’m spitting mad and ready to pull out the big guns.   I’m ready to get rid of those bugs. Still, I have noticed that there are benefits even to fire ants. An old fire ant mound is very easy to shovel and makes very good garden soil.  

Getting rid of bugs organically doesn’t require chemicals.  Even the dastardly fire ant cannot withstand a simple bacteria, spinosad.  I use the product, made up of spinosad, called Come and Get It to manage my fire ants.  

The following sections discuss several other methods of managing pesky insects.

Get Rid of Pesky Bugs with Mechanical Means

You can use mechanical means or physical barriers to keep harmful insects at bay.  Strategically covering your plants with a floating row cover can keep the insects away.  In this case, you must remove the cover when your plants need to be pollinated.

A tomato hornworm chomps on a tomato plant.  We don't need pesticides to get rid of this bug.  THey are easy to pick off.
A tomato hornworm chomps on a tomato plant. We don’t need pesticides to get rid of this bug. They are easy to pick off.

Another time-honored practice is to pick off harmful insects.  Tomato hornworms chomp on tomato plants.  Luckily for us, they are big enough that they are easy to see (except that their color blends in with tomato foliage), and you can pick them off.  Drop them in a bucket of soapy water. Snails are another pest that can be picked off to prevent further plant damage.

Get Rid of Pesky Bugs with Repellents 

You can use repellents such as garlic juice or citrus oil. This might make sense when you have stink bugs poking holes in your tomatoes.  Here’s a link for how to create a garlic juice spray

In the repellent category as well as the “building the health of the plants” category is a spray called Garrett juice, invented by Howard Garrett, the Dirt Doctor himself.  Here is a link to a homemade version of Garrett Juice.  

Use any repellents with care because they can harm both beneficial insects and foliage if used incorrectly.

A ladybug chows down on aphids, We don't want to get rid of this bug organically!
A seven-spotted lady beetle chows down on aphids, We don’t want to get rid of this bug!

Use Beneficial Insects

A final means is to introduce beneficial insects.  An example of this method is buying ladybugs to release which will eat aphids and keep damage to plants by aphids to a minimum. Another example is trichogramma wasps which bore into the eggs of more than 200 species of moths and butterflies (Lepidoptera) which are leaf eaters in their caterpillar stage. Examples of such garden pests include armyworm, cabbage looper, cutworm, borers, corn earworm, and codling moth caterpillar.

Where to go from here . . .

For more information on bugs, I like Malcolm Beck and Howard Garret’s book on bugs:  Texas Bug Book : The Good, The Bad, & The Ugly.  

You can use this book to help you identify which pest you have and then figure out a plan to deal with that pest.  Using a plan that specifically targets your pest can help save the lives of many beneficial insects.

I hope I have inspired you to put away the non-selective, chemical pesticides.  You don’t have to get rid of bugs organically or otherwise! Bugs won’t bug you if you take care of your soil, maintain the health of your plants, and use a strategic plan to deal with the remaining pests.

Water, Water Everywhere . . . in Your Texas Garden?

This post contains affiliate links. That means that if you make a purchase after clicking on a link I may earn a small commission at no extra cost to you. For more information, click here.

Water is a scarce resource in Texas.  I like to save water because I’d like to have Texas gardens around for my grandsons and their grandchildren.

Even so, I liked a meme on Facebook that said “The grass isn’t greener on the other side of the hill.  It’s greener where you water it.”  One of my nieces commented that we shouldn’t be watering grass.  She has a point.  We don’t have much water and we need to stretch it so that it will keep us thirst-free (and for my taste green) for the future.  Of course, that is overlooking the metaphorical meaning of the saying which I quite like.  Everything in life is better where you pay attention to it.

Pay close attention to your plants

Paying close attention can help you water your Texas garden in just the right way.  The goal is to keep your plants just watered enough for good health, but not too wet.  Not only is too wet not sustainable, too wet can be as bad as too dry.  Your plants can tell you whether they are too dry or too wet.  Watch for them to just begin to wilt, and that is the time to water.

Well, most of the time.  Like everything else about gardening there’s always a caveat.  In the heat of the summer, plants will wilt to conserve water.  In the morning, they will perk right up.  Knowing which plants behave this way requires paying attention, too.  If a plant is wilted in the late afternoon and still wilted the next morning, it is definitely time to water.

I have a water meter that you put in the soil and it tells you if the soil is dry, medium, or wet.  I wish I would use it more because it can be a big help when you have a question.  They are not expensive ($10 range).  You might use it if you have a plant that is wilted and you think it should not be dry.  This tool might also be useful if you wanted to check to see if you have watered deeply enough.

Gaillardia and Rudbeckia do not need much water to be beautiful.
Gaillardia and Rudbeckia in your Texas garden don’t take a lot of water to be beautiful.

Be sure to water enough to go deep into the soil

Watering your Texas garden may take more water than you think.  I have sometimes watered a spot of ground and then stuck in a shovel and been surprised that it was dry below 1 inch deep.  Clay soil such as we have here in central Texas is particularly difficult to tell if the moisture has gone down into the soil.  Clay expands as you water it causing the water to pool on top of the soil, but it has not soaked in. 

The roots of most plants go down into the soil further than the top inch. Where the roots are is where the plants get their water.  Grasses on the other hand may only grow roots to the depth that gets wet, and so the roots will never grow deeply unless the soil is watered well.  The deeper the roots grow, the less water the grass needs because the deeper moisture is protected from evaporation by the soil between it and the sun.  

Beginning gardeners (or helpers you’ve asked to manage your watering chores that aren’t gardeners) often make the mistake of watering too shallowly.  A quick pass of the hose over a spot will not take the moisture deep enough into the soil to keep the plants happy.   It is better to water thoroughly less often than it is to water a little bit every day.  As with grass, when the water goes lower into the soil, it will not evaporate as quickly as a few drops on the surface.

This plant was watered while in a plastic pot.  You can see that many of the roots got no water at all,
Here’s an example of your Texas garden needing more water than you think. This plant was watered while in a plastic pot.  You can see that many of the roots got no water at all,

Don’t water too much

The other side of the coin is you can overdo it.   Too much water is the leading cause of death in houseplants.  Eager new plant owners coddle their plants too much and water them every day.  Houseplants most likely only need water once a week.  Too much water leads to the poor baby drowning.  When a plant is waterlogged, the plant cannot get air into their roots from the soil.   A hole in the bottom of the pot is the best way to not create a swimming pool for your plant to drown in.  

If you have a pot without a hole in the bottom, you can do a couple of things.  I often take my drill to the bottom of such pots and create a hole where there was none before.  You can also add rocks to the bottom of the pot and then add the soil.  The rocks in the bottom create a reservoir for any excess water.  In this case, you will still need to be very careful that you don’t overwater the plant thereby filling up the reservoir and then the soil.

Milkweed looks beautiful, takes little water, and feeds the Monarch Butterfly caterpillars!
Milkweed looks beautiful in your garden, takes little water, and feeds the Monarch Butterfly caterpillars!

Choose native or drought-resistant plants

Outside, we need to do two things to conserve water in your Texas garden.  First of all, choose plants that don’t need as much water.  Getting a list of Texas native plants from your county extension agent or from the Native Plant Society of Texas  can help you in your quest to find drought-worthy plants.  (If you’re not in Texas, look into county extension agents from your area.) 

So many drought-resistant plants are quite beautiful.  Coneflower, Mexican Bush Sage, Esperanza, Pride of Barbados are a few standouts.  Second, preserve the water you do put on your plants.  In my Weeds blog post, I described my favorite method of covering the soil that keeps water from evaporating (cardboard and mulch.)

Mulch helps keep water in the ground and prevents evaporation into the air.
Mulch helps keep water in your garden and prevents evaporation into the air.

Use drip irrigation

Another way to keep water from evaporating is to use drip irrigation methods.  Watering our Texas gardens this way helps conserve ourprecious water. When I was farming, I used a drip irrigation system which was wonderful.  It had emitters every 12 inches.  We would start the drip, and then plant the seedlings where the wet spot was.  We could switch sections with a controller by the water pump.

Soaker hoses make good ground level watering to keep the leaves dry.
Soaker hoses make good ground level watering to keep the water off the leaves and directly in the garden.

For home gardening, I have found soaker hoses to be a cheap, easy way to do this in the home garden.  First, I lay out the soaker hose in a section.  It’s best that each section has plants with similar watering needs. 

Then, I connect a timer to the hydrant, and connect a hose to that timer. (Here’s the link to the timer I use. This is a mechanical timer, so you have to turn it all the way to the right, and then turn it back to time you want. The turning gives the timer the power to work.) 

I put quick release connectors to the end of the hose and the soaker hose.  (Here’s a link to the quick connect fittings I use.) I move that hose around to the section ready for watering, and easily connect it to the soaker hose.  I set the timer for the length of time I want to water.

If you don’t have a soaker hose system or a drip system, be sure to water your Texas garden in the early morning.  This conserves water by reducing evaporation and it also prevents diseases like fungi caused by too much water on the leaves of your plants. 

Here Comes the Sun … and Shade

The amount of sun or shade your garden gets is a critical factor in a plant making it or adding to your count of reaching the “500 dead plants level” gardener.  I learned this (of course, the hard way) back in my newly-married days.  (That means fifty years ago.)  We occupied the upper level of a two-story duplex and my brother and sister-in-law lived downstairs. 

First, they decided they wanted to start a vegetable garden, and so they plotted their garden out beside the garage that was behind the duplex.  Then, becausee It looked like so much fun, we decided we wanted a garden, too, but the only space left was rather shady. Dismissing that obvious obstacle, we forged ahead planting tomatoes and squash and corn.  While their garden flourished, our garden languished.  It just didn’t have enough sun to support vegetables.

To harvest lovely vegetables such as these lemon cucumbers, you will need a full sun location.

You can grow many things in the shade, but mostly not vegetables and mostly not flowers.  Of course, there are exceptions to every rule, but our little garden proved the point to me that sun and shade were very important elements of a successful garden.

Plant tags usually tell how much sun a plant needs.
This plant needs sun and was grown in Texas which is great!

How much sun does your plant need?

When you buy a little plant in the nursery, the tag usually tells you full sun, part sun, part shade, or shade as the plants’ preference.  If you don’t have a tag, you can always look up your plants’ preference online.  Seed packages also usually tell you how much sun the plant prefers. 

Remember though that the people who design the tags or seed packages or write the online copy may live in Maine or North Dakota.  Well, maybe not North Dakota, but you get the point.  The sun in Maine is not the same as the sun in Texas.  The sun in Texas is a whole lot hotter.  Because of this, you can make some adjustments from the recommendations if it says full sun.  But some adjustment does not mean full sun to full shade.  It probably means you can have morning sun (or about 6 hours sun) and afternoon shade.  

While roses do best in full sun, this one manages to bloom in a mostly shade location,

What’s this “part sun” and “part shade” designation? 

Seems like they mean the same to me, but there is a slight difference.  I think the terms mostly sun and mostly shade would be less confusing, but you won’t find that on most plant tags.  In most parts of the world, both part sun and part shade usually mean about 4-6 hours of sun, with part sun emphasizing the 6 hours of sun, and part shade emphasizing the 4 hours of sun.  

In Texas, the 4–6-hour rule probably means sun only in the morning and part sun might mean 4 or 5 hours, and part shade might mean 3 or 4 hours of sun.  It probably will take some experimentation to find where to put these kinds of plants. 

The flip side of the troubles with growing vegetables in a shady garden is that plants preferring shade will fry in full sun.  For example, a little baby impatiens will thrive in the shade.  Impatiens are one of the few flowers that like shade.  Put them in a full sun situation and observe them for a few days.  They actually look like they are shrinking away from the sun.  If they survive at all, they will be deformed and stunted.  

There are a lot of plants that are in the middle.  They prefer partial sun, or partial shade.  This means that they can have dappled sun, or get sun part of the time.  Each plant has its preferred combination.

Impatiens do best in shade.

What can you grow

in the shade?

Most Texans prefer shade because it’s cooler and keeps us humans from frying.  I really like some sun so I can grow flowers.  Now I have the sad situation that my front yard is almost entirely in the shade.  There are many flowers that I would love to grow, but can’t, because it’s too shady.  I have had to adapt.  By trying many new deep-shade plants, I have come to like them.  My shade garden boasts Turk’s cap, skull cap, Mexican honeysuckle, flax lily and oxalis.  

The edges of my yard support some part sun flowers. In these parts, I managed to get in some lantana which is one of my favorite plants.  My Grammy (or Grammy, Sr., as I like to call her) had lantana growing by the electrical pole in her front yard.  Back then, lantana was considered to be a weed.

These Grammy, Sr. irises were handed down and moved from place to place.
They are happy now in the side of the yard that gets mostly sun.

Different seasons means different sun in your garden

Bluebonnets love sun. I love bluebonnets. I have been able to grow bluebonnets because they sprout and grow in the wintertime. The leaves have fallen off the oak trees in my front yard, so the bluebonnets can get the full sun they need.

Different locations around your garden have different sun

Look around your garden to see the amount of sun and shade each location gets. To the side of my house is the sunniest, so I grow vegetables, roses, my fig tree, and a Meyers’ lemon tree in a pot so it can be brought indoors during the winter.  Passion vine grows on my fence.  I also grow my zinnias, obedient plants, bee bush, Greg’s Mistflower and purple hyacinth beans on a teepee made of old Christmas tree trunks.

Passion vine blooms well in a partly sunny location.

Too much sun can be as bad as too little sun in your garden

While my vegetable garden all those years ago suffered from too much shade, I have had plants that got too much sun.  Once I planted some agapanthus in the fullest of full sun, and they yellowed and refused to grow.  Because of this, and luckily, I could dig those up and put them in a partly sunny location.  We often will learn from the plants themselves where they need to go if we watch them and see if they flourish or languish in a particular spot.  If the plant is a perennial, usually you can move it to a spot that it will like better.

Some of My Favorite Garden Plants Sorted by the Sun and Shade They Desire

Full Sun

  • Bergamot
  • Butterfly Bush
  • Coneflower
  • Lantana
  • Obedient Plant
  • Purple Hyacinth Beans
  • Roses
  • Sunflowers
  • Vegetables
  • Zinnias

Mostly Sun

  • Asclepias (Texas Milkweed)
  • Bee Balm
  • Daylily
  • Esperanza
  • Geraniums
  • Greg’s Mistflower
  • Iris
  • Passion Vine
  • Pride of Barbados
  • Yarrow

Mostly Shade

  • Agapanthus
  • Amaryllis
  • Beautyberry
  • Herbs
  • Lemon balm
  • Mint
  • Peppers
  • Salvias
  • Spiderwort
  • Turks Cap

Shade

  • Ferns
  • Impatiens
  • Inland Sea Oats
  • Mexican Honeysuckle
  • Oxalis
  • Plumbago
  • Pigeon Berry
  • Purple Heart
  • Skull’s Cap
  • Spider Plant

The Best Method Ever to Deal with Weeds

Once we get our gardens all planted in the spring, the next hairy task to raise its head is getting rid of weeds.  Weeds are just plants where you don’t want them.  When I was a girl, lantana was considered to be a weed.  Nowadays nurseries sell lantanas of many kinds by the truckload.  

I once did a speech to a garden club in Uvalde and showed a picture of Antelope Horns, the Texas native milkweed, which grows wild on the roadsides and in the fields in that neck of the nearly desert.  I would love to have my garden full of them.  Both Monarch and Queen butterflies feed on them for sustenance. I think they have a gorgeous blossom with a complex flower.  I was waxing eloquent on the beauty of the flower when a woman in the audience said, rather loudly, “I think they are really ugly.”  I get it that there are different strokes for different folks, but just consider that the weed you are pulling may be the next nursery darling.

The very beautiful Antelope horns milkweed plant.  It may be a weed to some, but it ranks right up there with all the most beautiful flowers I have ever seen.
The very beautiful Antelope horns milkweed plant. It may be a weed to some, but it ranks right up there with all the most beautiful flowers I have ever seen.

Pretty Plants May Become Nasty Weeds

Sometimes weeds are plants that become invasive.  There is a kind of ruellia, often called Mexican Petunia, that is still sold in nurseries all over Texas.  I’ve seen them growing as part of the landscaping around schools and also in ditches.  If you ever see one in a nursery, I beg you to pass it by.  This ruellia can spit seeds over 10 feet away, as well as propagate by rhizomes (underground stems with roots). The former owner of my house had made the mistake of buying some, Then he spent the next ten years trying to figure out how to eradicate it.  He finally resorted to laying down tarp, covering it with pebbles and gardening in raised beds to avoid the pest.  Many years later, I still pull the stubborn offspring of this very invasive plant from my garden. 

Mexican Petunia plants become very invasive weeds.

Weed When Weed Plants are Little

I have read so many times to be sure to remove weeds while they are little and then it isn’t such a hard task, and it keeps things under control.  In spite of my best intentions, that is not the way it works for me.  I get slammed by something that keeps me out of the garden for a few weeks, and then I am so behind I can’t ever catch up.  Now if you are a person who really sticks to the schedule, then the weed while the weeds are little plan may work for you.  And I have no argument that this is the best plan.

Sticky weed that has taken over a part of the garden -- no plants can grow through these weeds.
Sticky weed that has taken over a part of the garden — no plants can grow through these weeds.

Using Herbicides to Kill Weeds

Of course, there are chemical alternatives for killing weeds.  Agent Orange, used in Viet Nam to remove foliage from the desert, ended up causing cancer in many veterans of that war.  The same company that manufactured Agent Orange now manufactures a popular herbicide. Users of their products developed cases of cancer and filed many lawsuits against this manufacturer. The company has settled for $10 billion.  (Source: https://www.cnn.com/2020/06/24/health/bayer-monsanto-roundup-settlement/index.html)

I personally dislike any chemical weed killers except in extreme cases.  By extreme cases I mean only one:  poison ivy.  I have had poison ivy show up as a gift from the birds in my yard, and I have three beloved grandsons.  I use weed killer, but never Roundup, for that purpose only.  For all other weeds, I use organic methods.

Organic Killers for Weeds

One organic method is to use corn gluten meal.  You apply it to the soil to prevent weed seeds from sprouting.  I tried this once, but it’s expensive, and I didn’t find it to be terribly effective.  With this method, the timing is so critical that I usually have all kinds of weeds before I can use a “pre-emergent” method.  I’m just not that efficient.

The Very Best Method Ever to Deal with Weeds

In my master gardeners’ class, one speaker recommended using cardboard topped with mulch as a way to prevent weeds.  I’ve found this to be such a dandy way that I try to use it everywhere I put a plant. 

I plant my little darlings that I have started from seed, and then I make sure they are surrounded by compost.  Then I cover the soil with cardboard, leaving a hole around the seedling for water to enter, and then cover the cardboard with mulch.  I buy mulch from the store, but you could use hay or straw if you can get your hands on it. This tip changed my life where weeds are concerned.  Of course, weeds are wily creatures and they will come up around the cardboard and through the mulch.  However, with the cardboard/mulch application, the weeds are much easier to pull.

Cardboard placed on bed around tomatoes is the first phase of keeping out weeds, and growing great plants!

Fully mulched garden bed provides many benefits to your plants as well as keeping weeds away.

Advantages of the Cardboard Method on Weeds and Plants

This method has so many advantages. 

  1. The cardboard/mulch suppresses the weeds. 
  2. Any determined weeds that come up through or around the cardboard/mulch are easier to pull. 
  3. The cardboard acts as an insulator. This keeps the soil much cooler so your plants can grow stronger roots. Stronger roots allows your plant to take up nutrients more easily because of the cooler temperature.  In our hot weather, this is an important technique for keeping our plants happy. 
  4. And the glue that is used to create cardboard just happens to be a food for the microbes in the soil.  Happy microbes mean happy plants because the microbes help plants take up nutrients in the soil. 
  5. Both the cardboard and the mulch add organic matter to the soil as they decompose.

If you are in Texas, try out the cardboard method and you will be glad you did!  Since this blog is specifically about Texas, I shouldn’t have to say this.  But if you don’t live in Central Texas, this method may not work well for you because it may keep the soil too cool for your plants to be happy. 

Begin Here 7 Steps to Start an Organic Garden

Want to start an organic garden?  It may be easier than you think.  The first question people ask me about organic gardening is what do you do about the bugs?  The answer is prevention!

Organic gardening creates healthy plants which are resistant to insects (in other words, bugs won’t bug you!)  Healthy plants not only resist bugs, they also resist other problems such as fungal diseases, viruses or bacterial diseases.  It is similar to how you get sick when you are run down or under stress.  Normally, you have those bacteria or viruses in your body.  It’s only when you are stressed that you succumb to the illness.  So, your most important goal in your organic garden is to create the healthiest plants possible. To create healthy plants, you need to feed the soil so that the soil can feed your plants. Below is Grammy’s guide to keeping your garden healthy.

Step 1:  Take very good care of your soil, and it will take care of your plants.  

That’s not just dirt out there!  There is a whole universe of life just beneath the surface.  Beneath the surface of the soil, there are millions of tiny microbes that can help your plants in many ways. You probably know that plants need nitrogen, phosphorus and potassium.  They also need all kinds of minor elements in order to grow and produce flowers or fruits. 

The microbes in the soil break up the minerals and other substances and make them available to the plants you are trying to grow.  Without microbes, your plants are malnourished.  Take care of those microbes so that they can take care of your plants.  

You gotta have catepillars if you want to have butterflies!

Step 2:  Avoid all bug killers and chemical plant fertilizers.  

When I say avoid, I mean don’t ever use them!  Keep in mind that 97% of all insects are beneficial.  If you use pesticides to kill the 3% that are pesky, you also kill those beneficial insects that help keep those troublesome ones in check – and you kill the life in the soil.  If the microbes have been killed, the soil becomes hard and doesn’t nourish the plants. 


Digging in compost is fun and healthy!

Step 3:  The best ingredient to put in your garden is compost.  

Buy a high quality compost from a reputable nursery or compost company.  Compost is a living substance.  It contains organic matter, which improves your soil, and also a full complement of microbes.  It is better to use compost that comes from a freshly finished pile, rather than bags of compost because the storage process may kill the microbes.  It is nearly impossible to use too much compost, but you only need about 1-3 inches spread over your garden area.  Gently scratch the compost into the top couple of inches of your garden area.  Tilling too deeply also kills the microbes so go easy on that.

Cardboard on a garden bed in between plants

Step 4:  Plant your seeds or transplants into your newly improved garden soil.  

As soon as your transplants are in or your seeds sprout, cover the soil with cardboard or newspaper and cover with some type of mulch.  Bagged mulch from the nursery is great, but you can also use hay, leaves, or wood chips.  Mulch is important for several reasons.  Most importantly, here in Texas where drought is always looming, it conserves water.  Secondly, it keeps the soil cooler, which helps the plant survive our hot Texas summers. Keeping the soil cooler also helps the microbes live. When the soil dries out, microbes die. Also, when the soil heats up, you lose nitrogen to the air.

Bell peppers, big tomatoes, and cherry tomatoes are your reward for gardening, and the birds get their share!

Step 5: Match Plants to Your Environment  

Healthy plants can also be stressed by many factors including temperature, the acidity/alkalinity of the soil, light and moisture. Choose plant varieties that are known to do well in your environment.  Your nursery can help you find varieties that are adapted to the local climate and soil type.  

Artichokes love lots of sun!

Step 6: Match Sun and Shade to Plants  

Almost all vegetables and most flowers require a lot of sunlight. Choose the site to start your organic garden where you get at least 8 hours of sunlight per day.  If you do not have a sunny site, you will need to plant a shade garden and choose plants that love the shade.  You probably will not be able to grow vegetables since almost all of them require lots of sun, but you may succeed with some herbs and flowers such as impatiens.

Sometimes you think you’ve watered well . . . It takes a lot more than we think sometimes.

Step 7: Water your plants “just right.”  

To start your organic garden, you need to water your plants enough to keep them from wilting. It is possible to water too much as well. Use the Goldilocks method:  not too much, not too little, just right.  Make sure you have good drainage so that your soil does not become waterlogged.  Plants drown in waterlogged soil, and microbes die as well in too much water.  Drip irrigation is the best way to add water to your garden.  You can use a sophisticated system or a simple soaker hose.  Drip irrigation keeps water off of your plants leaves, and it reduces evaporation.

Drip irrigation at the Rancho de la Chuparrosa farm reduces evaporation and keeps leaves dry

There you have it!  In seven easy steps, you have the start of your garden.  In later blogs, more information will be explored to help with each of these steps.  Happy gardening!